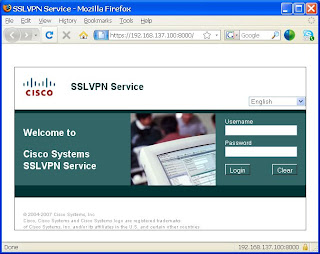
For this example, the router needs to provide a user on the 192.168.137.x network secure access to R1 through an SSL web portal. HTTP acccess, to R1, is provided through a URL link. HTTPS and SSH access, to R1, is provided by port forwarding. In a real world example, this type of access could allow emergency access for a network administrator from any computer.
The first step is to set up the authentication method for the user. The IOS SSL VPN uses the default AAA method by default. For this example, we will use local authentication with the commands below
aaa new-model
aaa authentication login default local
username cisco password cisco
webvpn gateway SSL1
hostname SSL1
ip address 192.168.137.100 port 8000
ssl trustpoint TP-self-signed-4294967295
inservice
The next step is to create the “webvpn context”. As stated earlier, this is the container for the VPN parameters. Within the “webvpn context” container, there are number of parameters that are defined and applied. For example:
- A URL can be defined
- The URL can be applied to a policy group
- The policy group can then be applied to the context
This is all within the “webvpn context” container. An example is shown below
webvpn context SSL
url-list “R1”
heading “R1”
url-text “R1-http” url-value “http://192.168.1.2”
policy group default
url-list “R1”
default-group-policy default
This shows the URL list, R1, being defined and then applied to the policy group, default. The policy group, default, is then applied to the context with the “default-group-policy” command.
In a similar manner, the IOS SSL VPN can support port forwarding. This is shown below.
webvpn context SSL
port-forward “R1”
local-port 5000 remote-server “192.168.1.2” remote-port 443 description “R1 HTTPS”
local-port 5001 remote-server “192.168.1.2” remote-port 22 description “R1 SSH”
policy group default
port-forward “R1” auto-download
default-group-policy default
This portion shows how to forward ports. When a user uses a web browser to access https://127.0.0.1:5000, they are redirected to https://192.168.1.2 through the SSL connection. Similarly, when a users uses an SSH client to access 127.0.0.1 on port 5001, they are redirected to 192.168.1.2 on port 22. In the “port-forward” command, notice the “auto-download” parameter. This causes the port forward connectivity to launch automatically, instead of requiring the user to click on the “thin client” start button shown below
The screenshots below show the GUI experience based on the configuration above.
1. The user accesses the web portal at https://192.168.137.100:8000
2. The user logs in and is presented with the web portal
3. At the same time as step 2, the port forwarding window appears with the setting for port forwarding
Below is the full relevant config for the example above
aaa new-model
!
!
aaa authentication login default local
username cisco password 0 cisco
no ip http server
no ip http secure-server
webvpn gateway SSL1
hostname SSL1
ip address 192.168.137.100 port 8000
ssl trustpoint TP-self-signed-4294967295
inservice
!
webvpn context SSL
ssl authenticate verify all
!
url-list “R1”
heading “R1”
url-text “R1-http” url-value “http://192.168.1.2”
!
!
port-forward “R1”
local-port 5000 remote-server “192.168.1.2” remote-port 443 description “R1 HTTPS”
local-port 5001 remote-server “192.168.1.2” remote-port 22 description “R1 SSH”
!
policy group default
url-list “R1”
port-forward “R1” auto-download
banner “Welcome to the IOS SSL Lab”
default-group-policy default
gateway SSL1
inservice


People deserve very good life time and mortgage loans or sba loan would make it much better. Just because people’s freedom is grounded on money state. ,http://www.suprayouth.com
I just sent this post to a bunch of my friends as I agree with most of what you’re saying here and the way you’ve presented it is awesome. ,http://www.belstaffjacketsale.me.uk
Thanks, I’m going to have nightmares tonight.,http://www.newpandorabeadsonline.com
Love those! I enjoy following your posts on facebook and rss!,http://www.coachfactorystores.ca
When you are sad, Swarovski will cheer you. When you are happy, Swarovski will liven you. When you are lonely, Swarovski will accompany you. ,http://www.cheapnorthfaceoutletonline.net