This is the fourth in a series of blogs, the DNAC Instant Demo tour.
Prior blogs in this series:
- DNAC Tour Part 1: Introduction to Cisco DNA Center
- DNAC Tour Part 2: DNAC Instant Demo: Beginning Your Tour
- DNAC Tour Part 3: General Navigation and Highlights: Dashboard, Drill Down, Assurance and Troubleshooting
I hope that by this point, you are starting to know your way around the DNAC GUI and getting an idea of a few out of the many operational tasks it can expedite for you.
In this blog, we’ll look at some of the items that you would set up in DNAC after installing it. Of course, they have already been populated for the demo. A secondary purpose will be to see how DNAC is organized to help you manage large numbers of devices (routers, switches, APs, users, phones, oh my!)
Discovery
>>>Documentation: Discover Your Network
Logically, one of the first things you’d have to do with DNAC is to discover network devices to get them into DNAC. That’s already been done for you with this demo.
Discovery uses SNMP along with CDP or LLDP with a range of addresses and a seed (starting) address.
While we don’t need to do run Discovery, we can take a look at some of it and related things you would typically do when getting started with DNAC.
Tour item: Go to Tools -> Discovery in the menus.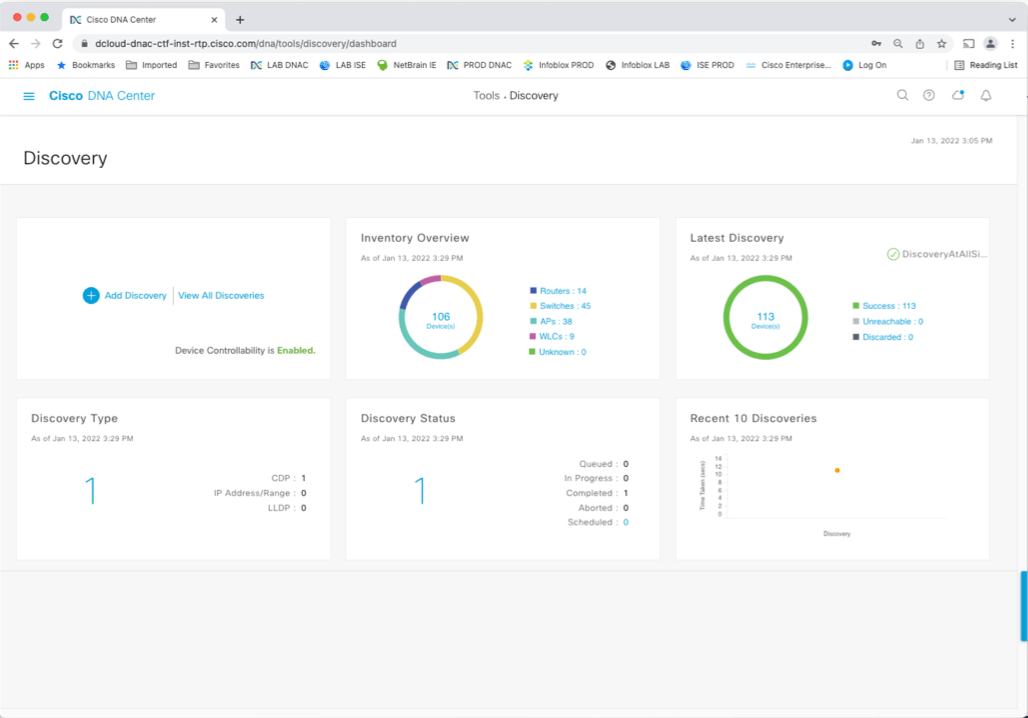
You might then click on ‘+’ to see what adding a new discovery entails.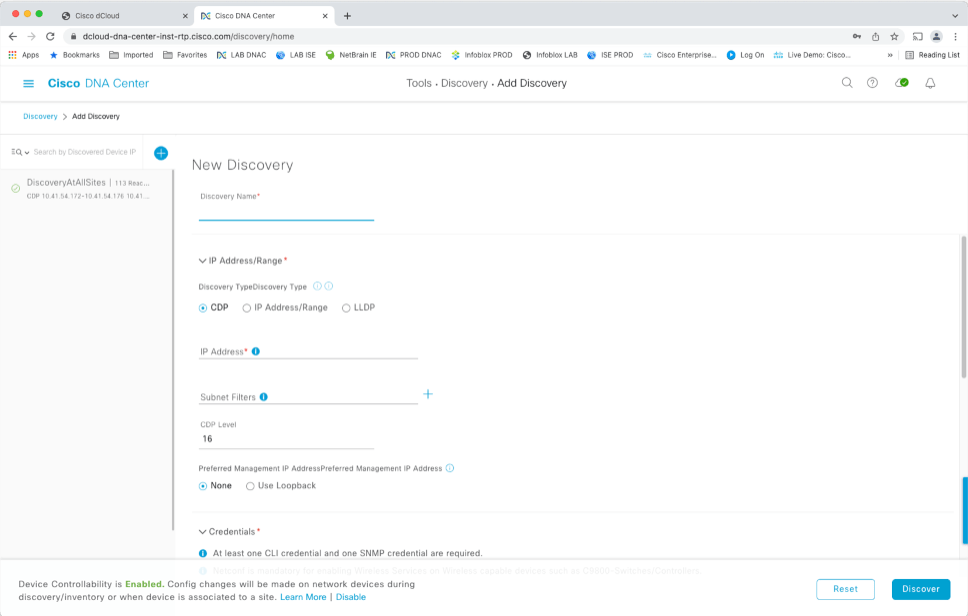
Note that you can discover different ranges of IPs and even single devices with various settings.
Tour item: Go back and click on view all discoveries. There’s only one currently in there. What I’ve seen in the field is that re-discovering single or a few devices quickly leads to a number of different discoveries. Doing one per site might be a better way to do things!
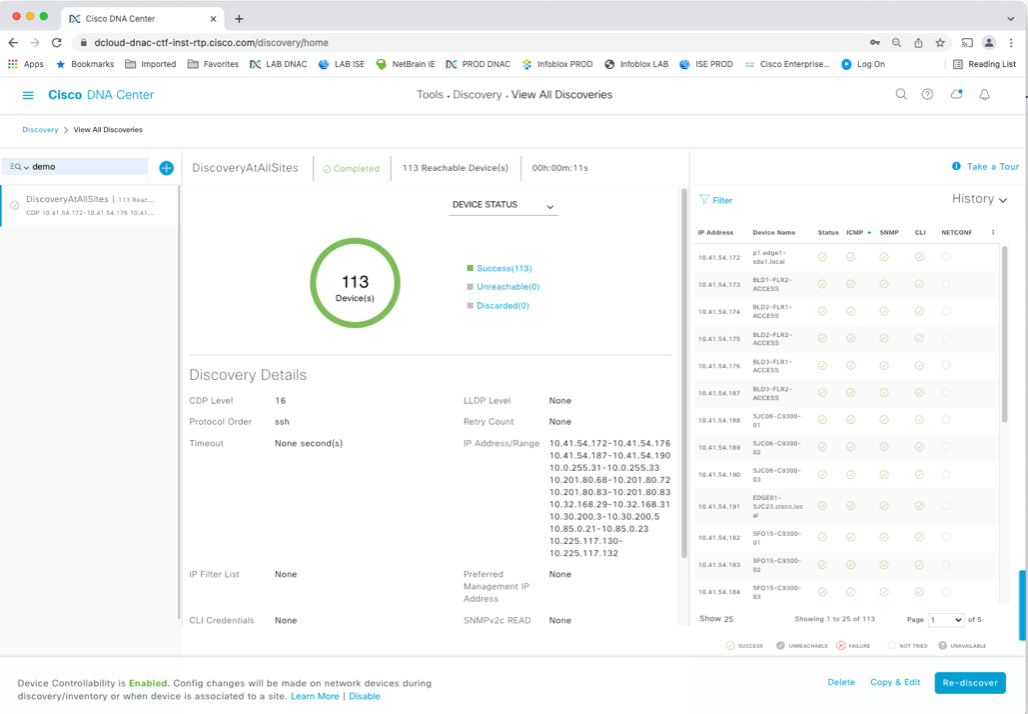
If you’ve looked, back out of anything discovery-related that you’ve gotten into.
If you’re interested in more details, you can, of course, (RTFM) documentation section.
Wait, CDP and SNMP?
Now, if you’ve been paying attention, you’re thinking, “yes, but how did CDP, LLDP, and SNMP get enabled in the devices, let alone routed connectivity to them?”.
Good question!
There are two choices for getting devices configured so you can discover them and get them into DNAC.
Choice #1 is where you have already manually configured basic connectivity, SNMP, and, say, CDP on the switches, so you have access to them via some “seed” switch.
If you have all the new switches (etc.) connected to a management switch, that can be one way to get them discovered.
The “Discovery Pre-Requisites” sub-section of the Discovery section in the Documentation should help with doing this.
You can discover based on a range of IP addresses, but that can be slow. A /16 block would take a LONG time!
Choice #2 is more powerful but takes a little learning and practice. It is PnP, Plug and Play. It is covered in the Documentation in the Provision Your Network -> Plug and Play Deployment Guidelines.
The short summary of PnP is that you connect your device, it finds DNAC, and it receives an initial configuration. If it fails to connect to DNAC, it reboots and tries again. This assumes you’ve never configured the device.
The actual set of events is a bit more complex but completely automated. You can do PnP at field sites to save re-shipping devices (first to HQ to configure them, then to the field site).
Some people prefer to do it with a pile of switches connected to one switch that is already configured and routed to your network. That simplifies applying a property sticker, is simpler when a device is uncooperative, etc. It’s another choice!
Provisioning and PnP
>>>Documentation: Provision Your Network
This documentation section covers PnP and a lot more! The point is various forms of automated configuration of devices and even whole sites. The context here is that you can use this functionality for non-SD-Access switches. There is a separate provisioning section in the menus and in the Documentation for SD-Access fabric provisioning.
Templates are a somewhat related topic. With templates, you can build a config template that generates a form that a junior tech can fill out or take input from a CSV file. And then configure a bunch of devices at once from that template.
All that is background info. But we’ll take a quick peek at these items.
Tour item: While we’re on the subject, let’s explore PnP a little bit.
Go to Provision -> Network Devices -> Plug and Play. (The “Network Devices” is a section header in the menus, not something you click on.)
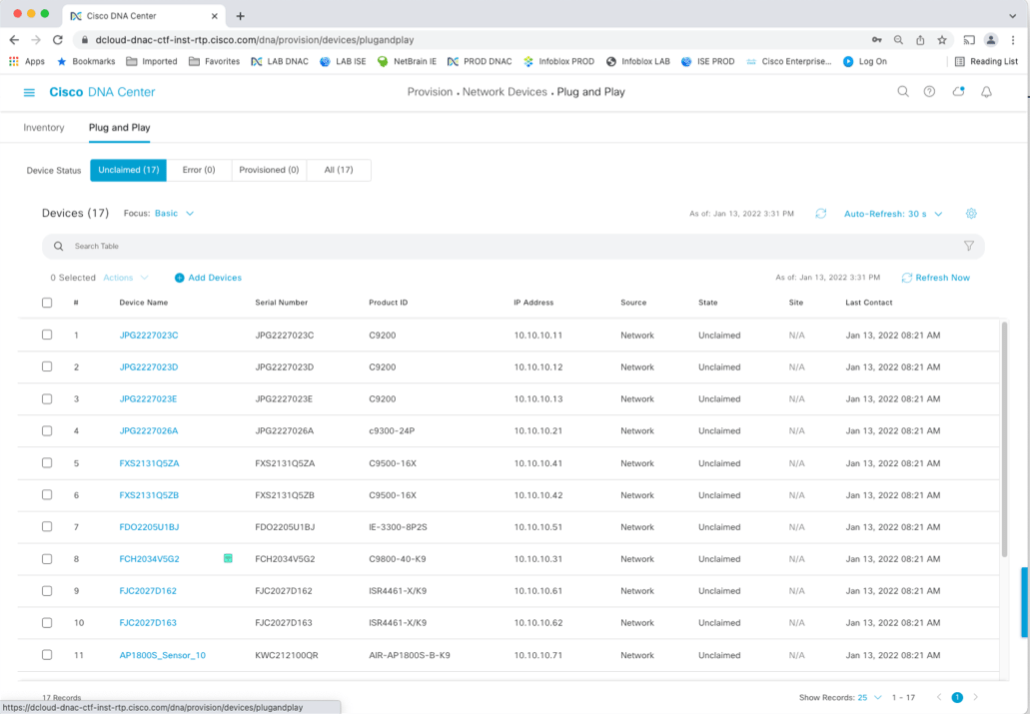
You can click on a device name to get more info. Try it!
Notice the tabs: Unclaimed, etc. Unclaimed are new devices that have shown up on the network, either via Discovery or manually added to DNAC by an administrator. If you’ve never configured a device, it has some pre-provisioned features that get it doing PnP.
Error shows devices with PnP errors. Provisioned shows successes. And All shows all the known devices. That wasn’t hard!
We’ll come back to the rest of Provision later. Well, at least key parts of this menu category.
Inventory
>>>Documentation: Manage Your Inventory
Once you’ve discovered devices, they are in your Inventory. They are already done in this demo instance!
Tour item: Let’s take a look at what is already in this DNAC instance’s Inventory.
To view the Inventory, go to Provision -> Network Devices -> Inventory. Note that “Network Devices” is a menu grouping header, not an item you’d click on.
Feel free to explore. You can sort columns by clicking, etc.
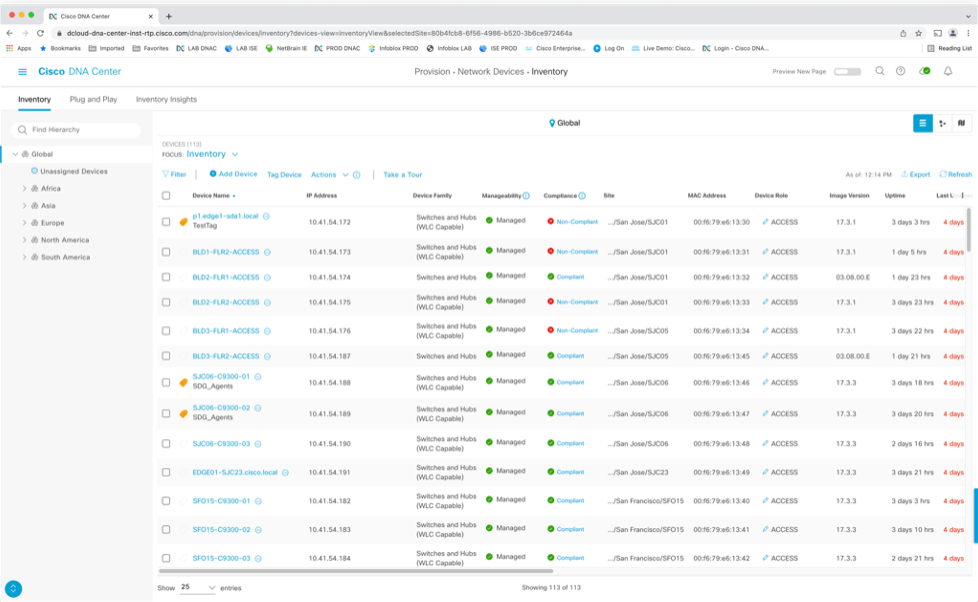
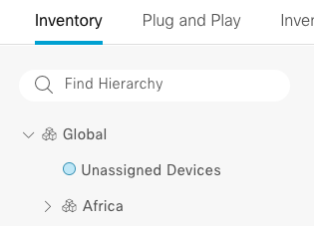
If you click on either of the white backgrounded icons to the right of “Global,” you can switch to one of two map views.

The locations at the left come from a step that follows Discovery, also found in a later documentation section, “Design Network Hierarchy.”
The idea is that once DNAC knows about your device (s), you assign devices to locations.
Of course, that means you also have to have prepared by telling DNAC about your locations, etc. We’ll visit that later in the tour (in the next blog).
Once you’ve assigned devices to locations, you can click on Global to see all devices or click on a location or sub-location to see what’s at that site. The demo devices have already been assigned to locations. So go ahead and try it!
When you do PnP or discover new devices, they show up in the Unassigned Devices item (just under Global on the left).
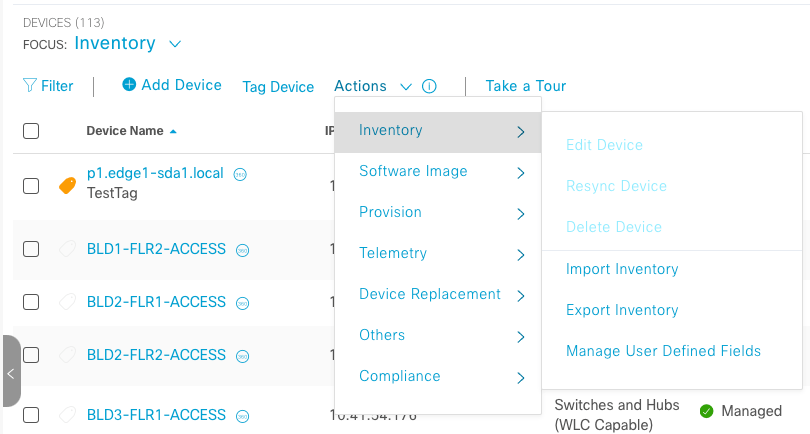
To assign them to a site, you would check one or more checkboxes on the left of the device name, then in the Actions menu, find Provision -> Assign a device to a Site.
So Inventory is pretty simple. It is the devices you own or at least those that DNAC knows about!
Tour item: take a look at the Actions menu items in the Inventory screen.
Templates
>>>Documentation: Create Templates to Automate Device Configuration Changes
Earlier, I mentioned Templates. Let’s take a quick look at the Templates just to get an idea of what they can do and to see what the template tools look like.
There is a lot of powerful capability in this part of DNAC, but it is arguably intermediate to advanced user material, and this tour assumes little prior DNAC experience. So you should know templates are there for when you’re ready to check them out In detail!
Tour item: go to Tools -> Template Editor.
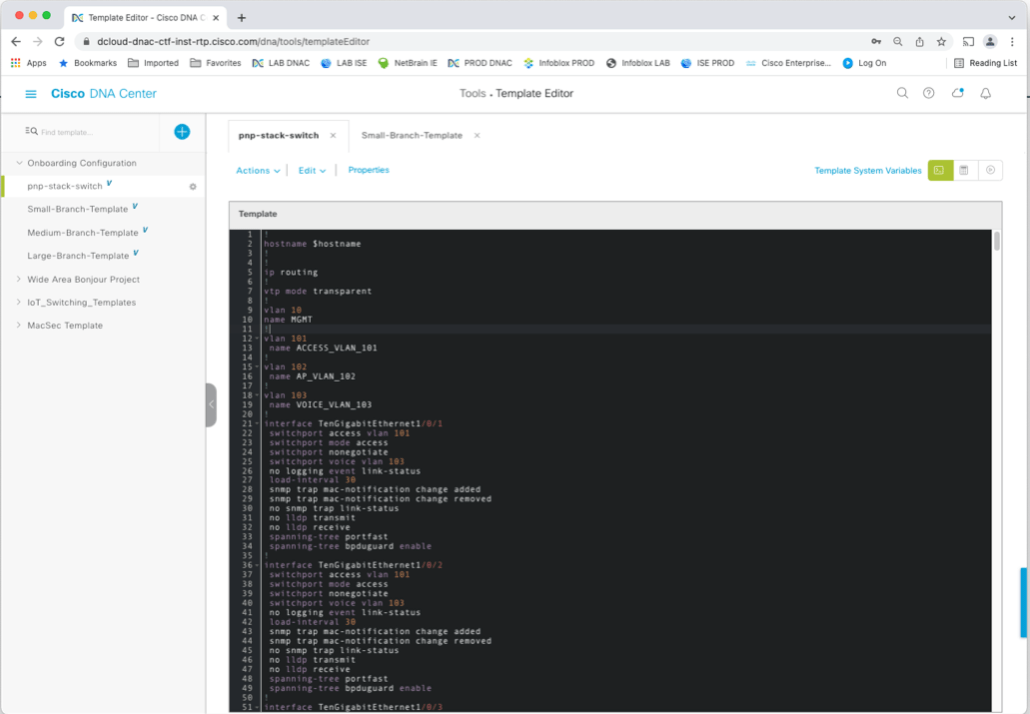
On the left, you’ll see categories of different simple (starter) templates. Click to expand Onboarding Configuration, which is what you’d use for onboarding switches after the PnP step (or initial manual configuration). You can clone these and edit them as needed. (Actions menu). Click on Properties, which covers the intended use of the template.
Looking at the small branch template, note the $hostname. This is a variable.
When the template is used to provision (configure) a device, the variable(s) can be supplied via filling out a GUI form or from a CSV file.
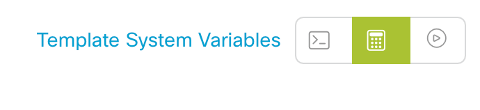
You can set up the form for a given variable to do validation, provide help text, etc., with the Form Editor. To see what it looks like, click the icon that looks (to me) like a calculator.
You can assign templates to network profiles, indicating what sort of site they might be useful for. When you associate a network profile with a site, you’ll then see the relevant templates under advanced configuration.
The small etc. site templates present in DNAC do not contain IP addresses. That tells me they are intended for L2 sites, where VLANs extend from leaf switches up to core switches.
Conclusion
At this point, you’ve seen more components of DNAC. I hope you are starting to know your way around and seeing what DNAC can do. I also hope you have some idea of how you get started using DNAC.
![]()