This blog is part of a series covering various SD-Access topics.
Previous blogs in this series:
- What Is SD-Access and Why Do I Care?
- Navigating Around SD-Access
- Managing SD-Access Segmentation
- Securing SD-Access Traffic
- SD-Access Single-Site Design
- SD-Access Multi-Site Design
- SD-Access Multi-Site Lab
This blog continues the Multi-Site Lab blog. The prior blog focused on what equipment to use and how to connect it. This blog shifts focus to “What should I do with my pile of SD-Access gear and servers?”
Note that the tasks below are intended to give you some ideas (and perhaps some idea of what you’re getting yourself into). No doubt your personal and your site’s need will somewhat differ!
Lab Diagram
Here is the lab diagram from the prior blog. The prior blog describes how to reduce the equipment needed by three (3) L3 switches (one 3850 or older, and two SDA capable.)
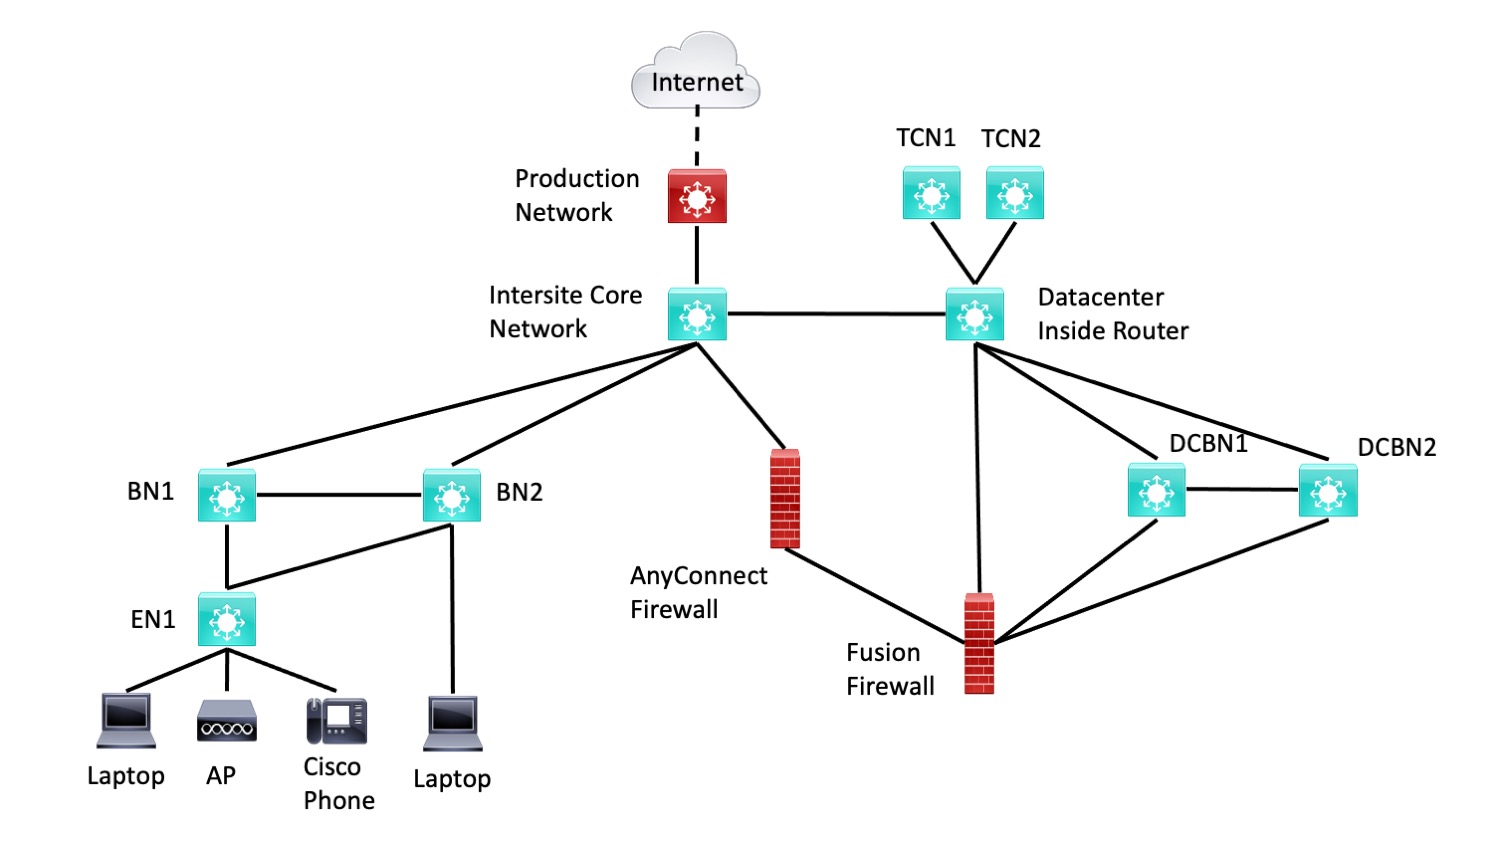
Figure 1: SD-Access Lab Diagram
Lab Tasks
The following is my list of ideas for what to do with the lab, broken up into blocks of tasks.
Lab pre-requisites:
- Make sure all the switches except for core and inside have SD-Access Advantage licensing. Retired 3650/3850 switches (or older) with L3 capability will work fine for core and inside routers.
The ultimate reference is Cisco’s Deployment guide. It provides the details of how to do many of the following items. Note that the following does not fully adhere to the order in the Deployment guide.
Get the lab server side of things built out:
- Deploy the lab ISE instance. Set it up to use MS Active Directory for authentication (if that’s what you’ll be doing in production).
- Deploy the lab DNAC instance.
- Integrate the two. **
Get the network lab built out:
- Physically power and cable and boot all the devices.
- Assign IP addresses to the underlay (everything in the above diagram) and to the management links.
- Configure the devices for basic IP connectivity, OSPF with BFD on interfaces, /30 or /31 addressing on links, and static routing to / from the production network. Test everything.
- Add basic manageability: local user/password login with privilege level 15, SNMP, NTP servers, DNS servers. Test it all.
- Add PIM multicast if you want. I put my RP on the inside router. I put an IGMP join-group on a loopback on TCN1, joining the group 239.0.0.1. Test it with a ping multicast to 239.0.0.1 from, say, DCBN1.
At this point, I recommend initially skipping over SDA tasks in DNAC like IP pools and segmentation planning and just getting devices into DNAC, assigned to sites, and getting their code upgraded to the target IOS-XE version. (See the step for this below.)
Note: Creating and using a configuration template makes the above go much more quickly.
Note2: Alternative: Do this via LAN automation. However, you’ll still need initial connectivity to devices. Also note that EN1 is all you’ll be able to do LAN Automation to, with BN1 and BN2 as seeds for one site. Or shut down a link and consider BN2 an edge node off BN1 as seed. (A little creativity goes a long way?) Also, you could use templates to test standardized configuration of border nodes via BN1 and BN2.
Start working with DNAC:
- Discover and manage all the switches in DNAC. Assign them to appropriate sites. **
- Get DNAC set up with a service account/access to Cisco. View available software images in DNAC (“SWIM”). Download an “N-1” image. Upgrade one or more of your lab switches to it. Upgrade them all if they are running somewhat older code.
Prepare DNAC for SDA:
- Create a hierarchy in DNAC, with Fabric1 and Fabric2 as the two fabrics (Fabric2 is just the FIAB device), Datacenter with DCBN1 and 2 in it, an IP Transit site named “Core” or something, and an SDA Transit site named “SDTransit” or “TunnelTerritory” or something fitting. **
- Define IP pools**:
- Create the global IP pool, the block of IPs you have reserved for the lab.
- For each site, you’ll need sub-blocks of that for BGP border handoffs, each VN, and access points. Also, multicast if you’ll be doing multicast. Your pool naming should reflect the intended use – see also the earlier planning blog. SITENAME-PURPOSE style of naming can be very helpful. The issue here is when provisioning in the GUI, you have to find the corresponding IP pool. For consistency, you need reliable matchups.
- For a lab, two VNs are plenty, say CORPORATE and IOT, for instance. CORP might have staff and contractor SGs within it. (You’ll likely want one VN with two SGs for demo/testing purposes.)
- Create VNs and SGs, assign SGs to VNs. **
- Assign devices to sites and provision network settings. **
Start provisioning the fabrics:
- Set up a fabric and provision fabric sites and roles for Fabric1, Fabric2, and Datacenter. (If you want redundant BNs, put both BNs into Fabric1 and skip Fabric2.)
- The BNs will also be CNs and can be ENs if you wish. (Perhaps not ENs for the DCBNs).
- I am omitting a lot of detail here – this is where you’ll use the deployment guide and figure out how provisioning works and getting used to the GUI. Or save time by having a friendly consultant provide you with hands-on walk-throughs.
- Do “Host Onboarding,” which assigns the IP Pools and prepares for using host ports on the switches.
Connect things up (depending on whether you’re doing IP Transit or SD-Access Transit):
- Manually configure IBGP adjacencies for the BN pairs.
- Configure the fabric site(s) for BN to core switch handoff via BGP.
- Do the same for the datacenter BN to firewall connections.
Test things:
- Make sure you have an end-to-end connectivity. (Ping 4.2.2.2 from the EN.)
- If you are doing multicast, test that works via the overlay and the FFW.
- Test site BN failover and fail back.
- Test datacenter BN failover and fail back.
- Test TCN failover and fail back.
Add and test edge devices:
- Laptop
- IP Phone
- AP (consider adding the WLC role for one of the BNs if you want to do fabric WLAN)
- WLC, if you have a lab physical WLC, and especially if you want to exercise OTT WLAN.
- With two ENs in a fabric (redeploy BN2 as “EN2”), you could test same-fabric tunneling within a security group, same-fabric forwarding to a different security group, and then use DNAC to apply a security policy for between SGs, and test if that is working. Use ISE with two test lab-only user logins to easily control which SG each laptop is assigned to.
** See also the Deployment Guide (link below). A later blog talks some about how to size and plan for real-world IP pools. For the lab and first pass lab work, it doesn’t matter much. A /27 or /24 each should be plenty.
Reality check: You’ll probably scrub everything and do a couple of passes “from scratch”, particularly if you’re writing a deployment checklist or document for a team deploying multiple sites, testing templates, testing IP pool schemes and fusion firewall or non-SDA firewall policies, etc. This is where LAN Automation may be especially helpful. You could make the first pass a rough cut with little planning, for familiarization. Then a re-do with planned naming and IP pools, to see if you got it right. Also to prepare any deployment documentation you’ll be writing. Then maybe a third pass with someone else or the deployment team “driving” to validate your documentation, clarify any obscure points, etc.
References
- Cisco Press book, Software Defined Access
- SD Access Distributed Campus Deployment Guide July 2019
- CVD SDA Fabric Deployment October 2019